Basic Sciences

The nose is the normal and natural entry point to the respiratory tract. Although as anaesthetists we often insert airway devices in the mouth, breathing through the mouth usually indicates abnormality or obstruction of the normal nasal airway or other respiratory difficulty.
Inhalational anaesthesia using a face mask preserves the function of the nose in warming and humidifying inspired gases. Even if an oropharyngeal airway is in place, nasal breathing often continues – the oropharyngeal airway simply keeps the pharynx open, allowing the nose to function normally. If the nose is bypassed for any length of time– for example by a tracheal tube or laryngeal mask – there is a risk of increased drying of laryngeal & tracheal mucosa, with impairment of their ciliary activity.
Revision anatomy
Take a few minutes to identify the structures in the picture below (answers at the end of this tutorial)
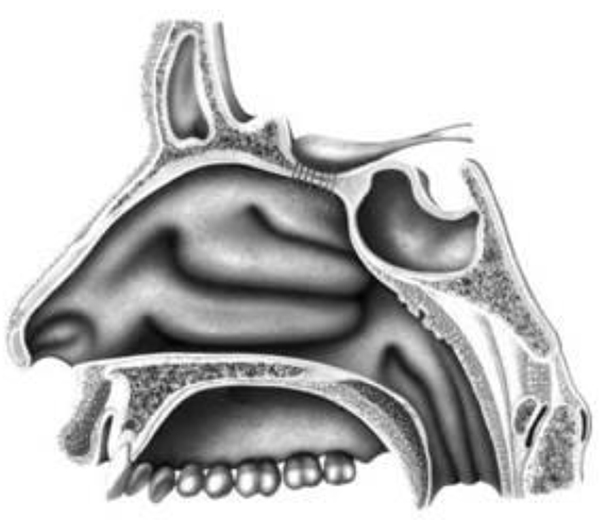
Notice that the floor of the nose (the palate) also forms the roof of the mouth, and lies horizontally. How might this information help you when inserting a nasopharyngeal airway or nasotracheal tube?
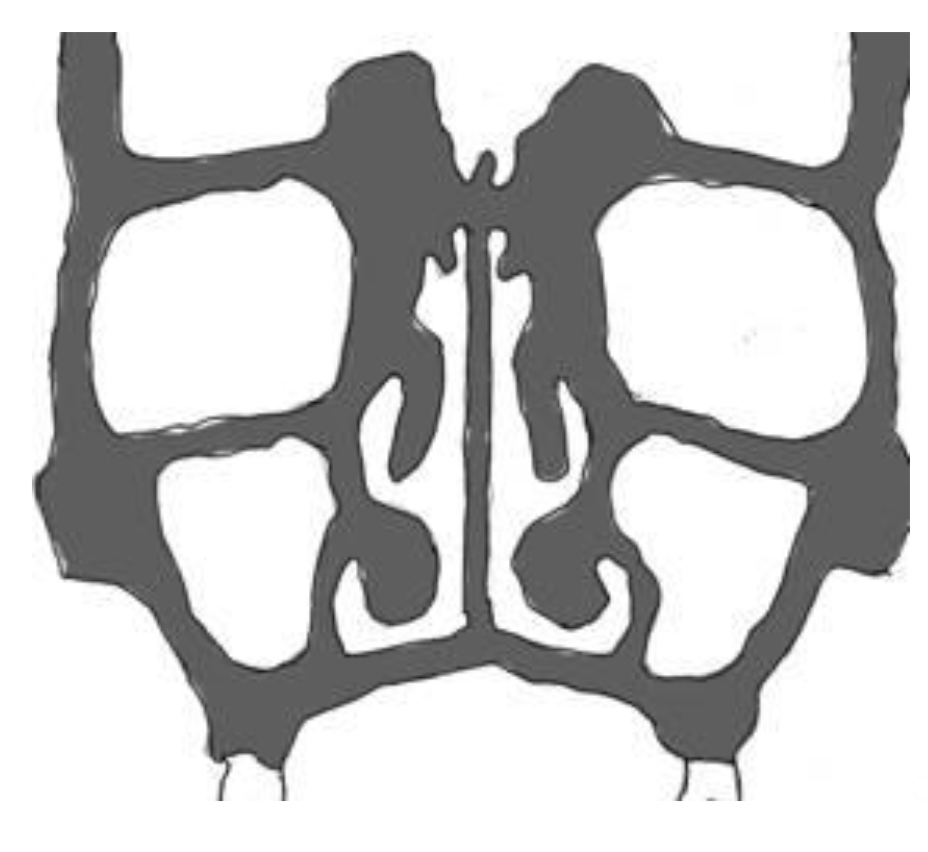
Coronal Section of Nose and Face
Orbit
Superior turbinate
Middle turbinate
Inferior turbinate
Maxillary sinus
The nasal septum is shown in the picture above, but it is often not a midline structure. It may also be deviated to one side anteriorly, but the other side posteriorly.
Mark on the picture where a nasotracheal airway or tube should lie in the nose.
When you assess the nasal airway pre-operatively ask the patient to breathe through each nostril, while occluding the other.
Nasal airway obstruction
The nasal airway is formed and supported by the bones of the skull, and needs no internal artificial support to keep it open – but it becomes easily obstructed by congestion or oedema of the mucosa. In children, adenoidal lymphatic tissue in the nasopharynx can cause chronic obstruction.
An upset or crying child will often have a congested, blocked nose – this may first be apparent after the induction of anaesthesia, when after applying the facemask you find that the airway is completely obstructed. The remedy is to place an oropharyngeal airway – if the patient is lightly anaesthetised use a short one to avoid gagging – your only aim is to part the lips and allow oxygen to pass into the oropharynx.
In elderly patients with no teeth, a similar situation can occur when your “chin lift” manoeuvre causes the chin and lips to overlap the nostrils.
Topical anaesthesia & medication
If you are planning to insert a nasal airway, nasotracheal tube, or fiberscope, it is advisable to use a topical vasoconstrictor in order to open up the airway and prevent mucosal damage. Traditionally cocaine was used for this; it is both an excellent vasoconstrictor and the best topical anaesthetic, but is difficult to obtain legally in many countries. Any locally available vasoconstrictor such as xylometazoline (Otrivine) will do, but it takes several minutes to work, so apply it early. 4% lidocaine is a suitable topical anaesthetic for the nose, pharynx & larynx.
Special sprays are available but are not necessary. Either drip the local anaesthetic/vasoconstrictor into the nose from a 2-ml syringe, or squirt it through a fine needle attached to the syringe. If you have an oxygen supply, you can make an atomiser spray using an intravenous cannula with a side port – connect the oxygen (2l/min) to the main inlet of an 18-gauge cannula, and inject lidocaine slowly through the side port – a fine spray will emerge from the tip of the cannula.
Nasal airway devices & their use
Nasopharyngeal airways like the one in the picture are available, or a shortened (preferably uncuffed) tracheal tube can be used. Pass the well-lubricated airway along the floor of the nose into the nasopharynx. Nasal airways are useful if you want to avoid putting anything into the mouth (for example if there are loose teeth or crowns that you want to avoid. Nasal airways are also better tolerated in semi-conscious patients than oropharyngeal airways BUT don’t use a nasopharyngeal airway in a head- injured patient where there is a risk of a basal skull fracture as there is a risk of introducing not only infection but the tube itself into the intracranial cavity with disastrous results!
Nasotracheal intubation
The use of a nasal tube allows free surgical access to the mouth, and is helpful to the surgeon is dental, maxillofacial, plastic and some ENT cases. A nasal tube normally needs to be 2-3cm longer than an oral one.
In a sedated patient, in whom the nose and larynx have been topically anaesthetised, it is perfectly possible to insert a nasotracheal tube “blind” (i.e. without laryngoscopy). Gently advance the tube along the floor of the nose; as it enters the nasopharynx you will normally hear breath sounds through it – continue to advance and if breath sounds continue, and the tube is all the way in, you have entered the trachea. If breath sounds through the tube stop, withdraw slightly, adjust the position of head & neck (usually by increasing neck extension) and try again. The same technique can be used in unconscious patients if they are breathing spontaneously, but blind nasal intubation after the use of muscle relaxants is a very uncertain affair. Blind nasal intubation can be a valuable rescue technique in the case of unexpected difficult laryngoscopy – practice it whenever you can.
In patients who are unconscious and relaxed, direct laryngoscopy is the most straightforward way of inserting a nasal tube, using Magill forceps if necessary to pick up the tip of the tube in the pharynx and lift it forward between the vocal cords.
Nasal intubation under direct vision
If you do not have a pair of Magill forceps, ovum forceps from the gynaecology set will do the job.
When passing a nasal tube under direct vision, pause when the tube is level with the tip of the epiglottis and mark the tube with a felt-tip at the level of the nostril. At the end of anaesthesia you can withdraw the tube to this mark, and be certain of the position of the tip.
Tube size and resistance
The nasal cavity may be the narrowest part of the airway through which your tube has to pass, so firm resistance is often felt, especially when a cuffed tube with its added bulk is used. It may help to use a topical vasoconstrictor such as “Otrivine” (xylometazoline), but only if you give it several minutes before the intubation attempt. Always use a well-lubricated tube, softened by 30 seconds immersion in warm water. There is little advantage in using the biggest tube possible unless the patient will be breathing spontaneously, in which case a larger tube has a lower resistance and means less respiratory effort. If you need to use a larger bore tube, consider using a plain tube and a pharyngeal pack instead of a cuffed tube.
Although some resistance is common, you should not use excessive force. If you are unable to advance the tube through the nose, try the following:-
Check that your angle of insertion is parallel to the floor of the nose
Try gentle rotation of the tube
Try insertion through the other nostril
Use a smaller tube, or an uncuffed instead of a cuffed tube
If excessive force is used, it is possible to tear the nasal mucosa, and for the tube to then pass underneath the mucosa behind the pharynx; when you insert the laryngoscope you will see a “phantom” of the tube behind the posterior pharyngeal wall. Although this is very alarming, it rarely causes a problem. Withdraw the tube and use the other nostril; it is also wise to give a dose of prophylactic antibiotics.
During nasotracheal intubation (particularly when you are using a “Blind” or “railroading” technique) the tip of the tube may get held up at the larynx. Most usually this is because the tip of the tube has passed to the right of the right vocal cord.
Withdraw the tube slightly and rotate it (easier with a reinforced tube, as with soft tubes the rotation you do at the top is not well transmitted to the tip) Clockwise rotation by 90 degrees should position the very tip of the tube at the back of the cords, where the opening is widest – you may also need to flex the head slightly, after which the tube should advance without resistance.
Rotate the tube clockwise if it is held up at the larynx
Risks of the shared airway
Nasal intubation is often used when the surgeon is working close to or in the airway. Be especially vigilant in these cases. Never paralyse and ventilate the patient unless you have a reliable disconnection alarm, as accidental disconnection of the breathing circuit during this sort of surgery is common, and an un-noticed disconnection in a paralysed patient is likely to be fatal. Better to allow the patient to breathe – if then disconnected the problem will be that they become too light – not desirable but better than a fatality. Expired carbon dioxide monitoring is the best in this situation, as it should indicate disconnection or obstruction whether or not the patient is breathing spontaneously.
Make a list of all the indicators of a disconnected tracheal tube
Different Types of Endotracheal Tube
A variety of tubes is available – most commonly in plastic. Each has potential advantages and disadvantages
- Plain(uncuffed)
- Easiest insertion
- (especially when blind)
- IPPV difficult even with pack
- Standard tube
- (cut slightly longer than for oral use)
- Readily available
- Connector close to nose
- Polar tube (“North facing”)
- Connector on forehead
- May kink when warm
- Reinforced tube
- Easier to rotate through larynx
- Connector close to nose.
- May cause pressure sore
- Click here for more details
What precautions should you take when inserting a pharyngeal pack?
Fibreoptic Nasal Intubation
The introduction of intubating fibrescopes has brought about major changes in airway management. There is no substitute for being able to see where you are going under controlled conditions. It is important to realise what you can and cannot do with a fiberscope – some of the possibilities and difficulties are listed below:
YOU CAN
- Anaesthetise the upper & lower airways using a “spray as you go” technique
- Navigate the airway easily under topical anaesthesia, even when the anatomy is abnormal
- “Railroad” a tracheal tube which you have pre-loaded on to the scope
- Check the position of the tube after intubation, and make sure it has not entered a bronchus
BUT IT MAY BE DIFFICULT OR IMPOSSIBLE TO
- Use a fibrescope in cases of unexpected failed conventional laryngoscopy
- Get a clear view of the larynx in the unconscious, supine patient without a trained assistant to pull the jaw & tongue forward
- Safely intubate where there is laryngeal or tracheal compression or tumour
- Look and oxygenate at the same time
In unconscious patients, a better view is often obtainable if you position the patient in the lateral position – it really does open the airway, improves the view, and prevents saliva and secretions from obscuring the larynx; it does require a little practice and “mental gymnastics” to see the larynx appearing on the right of the picture rather than the “top” but it is well worth the effort of acquiring this skill. A similarly superior view in awake patients is obtained if you have them sitting up. The supine position is invariably the hardest for fibroscopy, even though it is the one you are most used to for conventional laryngoscopy.
There is not enough space in this tutorial to give a detailed description of the technique, but the most important principles are:
Give supplementary oxygen, especially if the patient is sedated. The easiest way is to pass a fine catheter through the opposite nostril as far as the nasopharynx, and trickle 2 l/min of oxygen through it.
Pass the instrument along the floor of the nose
Open airways are “Black Holes” – aim for these open spaces
A fuzzy pink view means the end of the scope is against mucosa – withdraw until you see the black hole again, then advance down it.
The instrument has a “fish-eye” lens, so perspective is altered. Objects such as the epiglottis look very small until you are really close to them.
Although the laryngoscopy is done under vision, the intubation is done blind by railroading. Check the position of the tube afterwards, and make sure it is not too close to the carina.
Nasal Oxygen therapy
Although the nose is the natural airway, it has become routine to use facemasks to administer oxygen to patients who are hypoxic or in the postoperative period. Delivery of oxygen into the nose, either by a single nasopharyngeal catheter or nasal prongs, is both effective and cheap.
Lower flow rates of oxygen can achieve comparable results to face masks, and nasal oxygen allows patients to eat, talk, and cough normally. Wearing a facemask for long periods is uncomfortable and most patients strongly prefer nasal oxygen to a facemask. If prongs are available, the nose can do its job of humidification and warming, and a separate humidifier is not needed.
Summary of this unit:
The nose is the normal upper airway
Understanding nasal anatomy is the key to effective airway management
Always use a gentle technique, and the smallest tube that will do the job
Extra vigilance is needed when the airway is shared to allow surgical access
Further reading
- Aids to tracheal intubation (Update in Anaesthesia No 17)
Answers to anatomy quiz
- AFrontal sinus
- Sphenoid sinus
- Superior concha (turbinate)
- Middle concha (turbinate)
- Inferior concha (turbinate)
Where does the tube pass?
Along the floor of the nose, below the inferior turbinate
This work by WFSA is licensed under a Creative Commons Attribution-NonCommercial-NoDerivitives 4.0 International License. To view this license, visit https://creativecommons.org/licenses/by-nc-nd/4.0/