General Topics

QUESTIONS
Before continuing, try to answer the following questions. The answers can be found at the end of the article, together with an explanation. Please answer True or False:
- Regarding humeral IO access:
a. Infusion rates comparable to those through subclavian central lines can be achieved
b. Can be used to safely administer resuscitation drugs
c. Landmarks for IO insertion points are always easy to find in obese patients
d. It is the most painful site for insertion - The following are suitable sites for IO access in young children:
a. Distal femur
b. Sternum
c. Proximal tibia
d. Humeral head - The following are contraindications for IO access:
a. Fracture proximal to the proposed IO insertion point
b. Burns distal to the proposed IO insertion point
c. Local sepsis over proposed IO insertion site
d. Systemic sepsis - The following are complications of IO access:
a. Extravasation
b. Microfracture
c. Osteomyelitis
d. Osteoporosis
Key Points
- The intraosseous (IO) route is an underutilised, reliable and extremely valuable alternative to venous access
- IO access can be used in trauma, emergencies, and in cases requiring volume resuscitation
- There are several devices and sites that may be used for IO access
- Inserting an IO needle is easy to learn, but success depends on familiarity with the equipment and correct technique, as described in this tutorial
INTRODUCTION
Intraosseous (IO) access is an alternative method to providing venous administration of drugs and fluids. Commonly used by the military and pre-hospital medics, intraosseous access has expanded its use to a variety of settings: in the emergency department, at cardiac arrests, in the paediatric population, and is gaining popularity in adult settings where intravenous access is challenging or time critical.
The IO route is now endorsed by The Resuscitation Council UK and is in the current Adult Life Support (ALS) and Advanced Paediatric Life Support (APLS) guidelines (1,2).
VENOUS BLOOD DRAINAGE FROM BONES
Theoretically, intraosseous access can be obtained in any large bone and current devices support several specific points of access, including the sternum.
As bones are non-compressible, the intraosseous space will stay patent, even in shocked patients. This provides a readily available route for infusion of drugs or fluids in an emergency, while also providing access to bone marrow aspirate, which can be used for some simple blood tests(3,4).
The venous plexus of long bones has been shown to drain in to the central circulation, at a rate comparable to central venous access (4-7).
Fluid resuscitation can also be accomplished via the IO route(8), with respectable flow rates of 1–3L/hour via tibial access or 5L/hour via humeral access. Due to the intrinsic pressure of the intraosseous space, infusions commonly do not flow effectively with gravity alone and need to be administered under pressure e.g. using pressure bags, syringe driver or manual flushing.
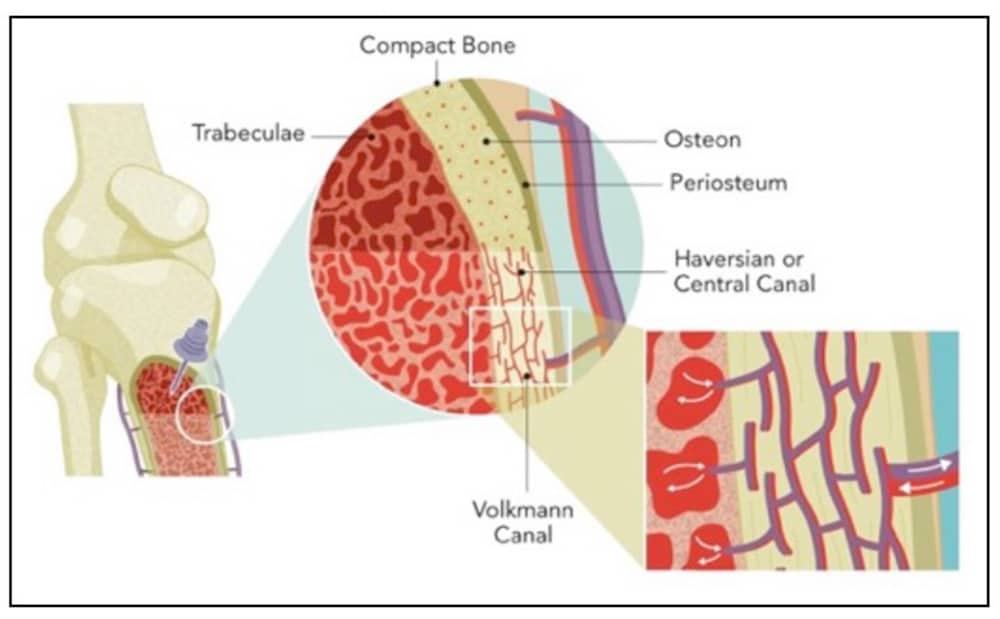
FIGURE 1: Vascular anatomy of long bones. Intraosseous access is achieved in the trabeculated space of the bone. (Courtesy of Vidacare/Teleflex)
INDICATIONS
There are numerous conditions where IV access may be difficult and this can be overcome by using the intraosseous route. All forms of physiological shock, hypothermia, multiple previous intravenous lines, or intravenous drug use are common situations where IO access has proven invaluable(9-12).
CONTRAINDICATIONS
Absolute
- Bone trauma at or proximal to the insertion site, or previous IO insertion in the same limb: disruption of the bone at or proximal to the site allows for extravasation of infusions and potentially the development of compartment syndrome (9-11).
- Infection overlying the point of insertion: there are concerns of seeding the infection into the bone and causing osteomyelitis (11-13)
Relative
- Prosthesis in the target limb (knee replacement, tibial nail, humeral plate), or previous sternotomy: the disruption of the bone matrix can unpredictably interfere with insertion or flow rates and insertion into in-dwelling metal work could potentially cause damage to the prosthesis or IO needle.
- Difficulty in identifying anatomical landmarks: in these patients, IO devices should be deployed with extreme caution, as damage could be caused to other underlying structures(12).
COMMON ACCESS SITES
While there are several insertion points described, it is important to acknowledge that some devices are limited to specific anatomical sites. The anatomical landmarks for the most common sites are described below:
Humeral head
With the elbow bent, and the patient’s hand on their abdomen, palpate the surgical neck of the humerus to locate the greater tuberosity. The insertion site is approximately 1 cm above the surgical neck and 2-3cm lateral to the biceps tendon (Figure 2). Insert at a 45-degree angle, aiming towards the opposite scapula. The manufacturer does not recommend this technique in paediatric patients, but clinical judgement will need to be used(11).
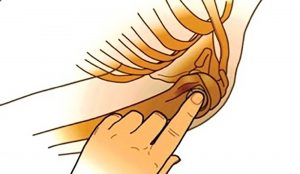
FIGURE 2: Landmarks for humeral insertion (Image courtesy of Vidacare)
Proximal tibia
2cm medial and 1-2 cm below the patella, palpate the tibial tuberosity and ensure that you can feel bone below subcutaneous tissue (Figure 3). The needle should be angled slightly distally, away from the knee(11).
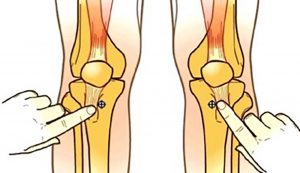
FIGURE 3: Landmarks for tibial insertion (Image courtesy of Vidacare)
The following routes are less commonly used but may be considered if the proximal tibia or humerus are not available:
Distal tibia
Palpate the most prominent aspect of the medial malleolus, as well as the anterior and posterior borders of the tibia.Ensure the flat part of the bone is located and insert 3cm proximally to this point, at 90-degrees to the skin(11).
Distal femur
With the leg fully extended at the knee, palpate the external condyles of the distal femur. The ideal insertion point is 2- 3cm superior and 1-2cm medial to the anterior midline (proximal placement is important to avoid growth plates in younger patients). The leg should be immobilized until the cannulae is removed as movement at the ipsilateral knee may cause the quadriceps tendon to displace the cannula (16).
Sternum
This route of insertion has been useful in military casualties, as the sternum is often protected by body armour and thus intact after major trauma. Locate the manubrium, approximately 2cm below the sternal notch, and insert at 90 degrees to the skin. Fluid flows into the internal mammary veins, into the azygous veins, and then into the central circulation(7,14).
GENERAL ADVICE FOR ESTABLISHING IO ACCESS:
In all IO access attempts, the following key points should be followed:
- Sterilisation of the skin at the needle insertion site
- Manual stabilisation of the bone during insertion
- Aspiration after needle insertion confirms successful placement
- In the awake patient, injection of local anaesthetic (preferably lidocaine) into the IO needle prior to use can reduce pain for subsequent infusions
- Ensure the needle is flushed with at least 10ml of fluid after drug administration
- Clear documentation of the procedure in the patient notes
- Frequent assessment of the IO site for signs of extravasation
TYPES OF DEVICES
Manual trocar
These require significant insertion force and are commonly used in paediatric patients for lower limb access sites. The main advantage lies in the simplicity of the device and lower cost. However, there is a steeper learning curve and more force is required for insertion compared to other devices.
Spring loaded devices
These use a spring-loaded system to assist penetration into the medullary canal. These systems are single-use and include the bone injection gun and sternal IO device. The cost is slightly lower for a complete system but the entire device is single use and therefore costs more than individual needles on reusable systems. These systems also require more training to ensure appropriate use.
Drill based devices
These are battery powered and allow easier placement in a wide variety of access sites. There are a number of manufactures of these devices and so connections between the needle and driver will differ. This device is easy to use and requires less training. The driver is reusable. Cost per needle is higher than the individual manual trocar but less than a spring-loaded device.
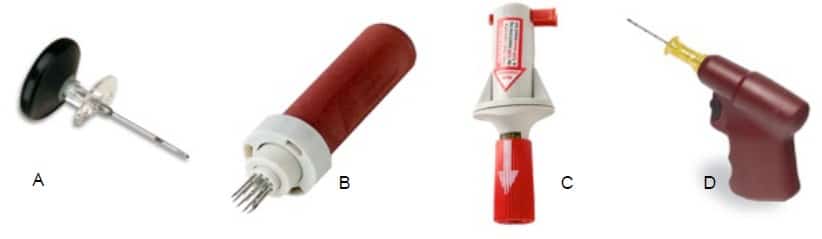
Figure 4: Different IO access devices.(A) Manual trocar (B) Sternal IO device (C) Bone Injection Gun (D) EZ IO drill
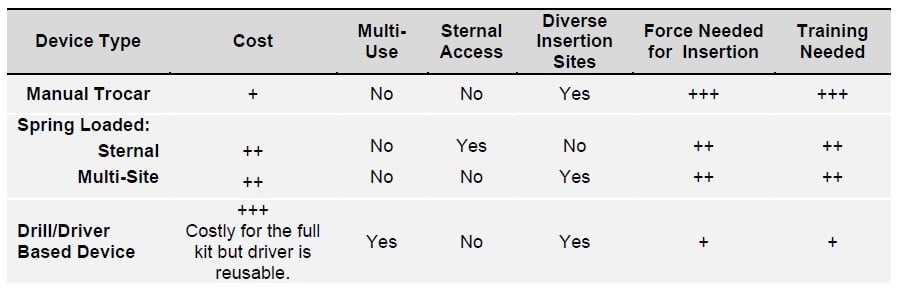
Table 1: Summary of Intraosseous Access Device Characteristics
INSERTION AND REMOVAL TECHNIQUE
Manual trocar
To insert this IO needle, a twisting motion is used with the driving force directed through the palm of the hand. Pivoting of the trocar on insertion can lead to an ill-fitting IO cannula leading to extravasation of infusions. This device should be limited to paediatric use on lower limb sites as excessive force is needed for insertion in adult patients.
FAST sternal IO access
This system consists of a delivery device, which houses the stabiliser spikes and infusion tubes(14). Clean the manubrium (the area 2cm below the sternal notch) and apply the supplied target patch to the skin(14,15). A two handed technique is needed as significant force is required to pass through the manubrium(9). After activation, the delivery device is removed and the IO catheter is left embedded. A plastic dome is attached to the target patch to secure the device. Blood may be aspirated and 5-10mls of isotonic saline should be used to flush the device(9). To remove the device, disconnect all tubing, remove the protective dome, and pull the IO cannula perpendicular to the manubrium. Cover the site with a sterile dressing(9). When a patient is supine, the angle of the manubrium should be noted to ensure perpendicular insertion. There have been isolated reports of pneumothoraces, so caution should be applied in those patients with small stature, sternal fractures, and in patients who have had a previous sternotomy(9).
Bone Injection Gun (BIG)
These are licensed for use in the proximal tibia and the humerus. The device is commonly colour coded; blue for adults, red for children and green for use by veterinary surgeons(10).
To use the BIG, locate the anatomical landmark and clean the area. Remove the safety cap from the device and place the barrel at 90 degrees to the skin. One hand should hold the barrel and provides stability, while the other hand squeezes and removes the red safety catch. In order to deploy the device, push down firmly with the palm. The trocar and needle should deploy into the medullary canal with an audible ‘click’, which confirms activation(10).
Remove the trocar and secure the needle to the skin by taping the safety catch around it. As with all IO access devices, aspiration of marrow confirms placement but this is not always possible. The cannula should then be flushed with 10ml of fluid(10). The device is removed by firmly pulling and rotating the needle from the site(9). The wound should be covered with a sterile dressing.
EZ IO drill
This is a handheld drill device, which consists of a power driver and needle set. There are three different needle and stylet combinations, suited to different patient sizes. There are needles for patients weighing 3-39kg, more than 40kg, and a large needle for patients with excess soft tissue(11).
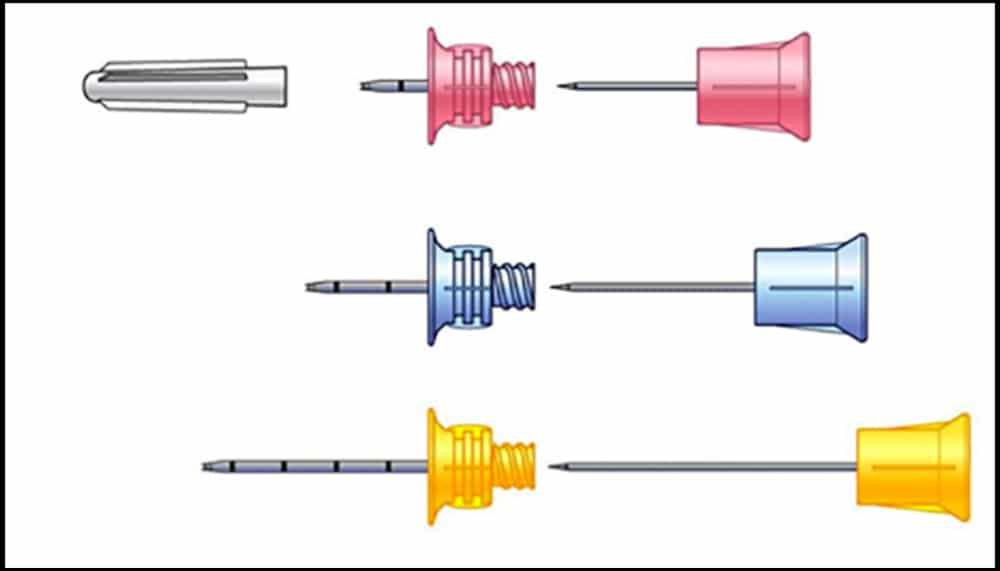
FIGURE 5: Different EZIO needles (Courtesy of Vidacare/Teleflex)
Select and clean the designated insertion site. A suitably sized needle should be magnetically attached to the driver. Support the limb and stabilize the bone while the needle and driver are gradually pushed through the skin and soft tissue until contact with bone is made. For the needle to fit appropriately, at least 10mm (one black marker line on the needle) should still be visible before drilling. In obese or larger patients, the needle size may need to be adjusted to compensate for the excess subcutaneous tissue. Advance the system en bloc at full drill speed until there is a sudden decrease in resistance. After this change in resistance, stop and stabilise the hub with one hand, unscrew the stylet counterclockwise and remove it. Aspiration of marrow helps to confirm placement but this is not always possible. After removing the stylet, place the EZ-Stabilizer™ over the hub and attach a primed EZ-ConnectR extension set. The system should be flushed with 10mls of fluid and an IV giving set can now be connected.
To remove the device; detach all connection tubing, secure a 5 or 10ml luer-lock syringe to the needle, then pull and rotate en bloc, clockwise, under firm traction. Avoid bending the needle on removal. Alternatively, needle forceps can be used to grip the device and remove under firm but controlled force. Cover the wound with a sterile dressing (9-11). The EZIO device is larger and heavier than the other devices. However it is reusable and intuitive to use.
OTHER CONSIDERATIONS
Management of IO device
When transferring a patient with an IO device to another team, a comprehensive handover should include; written documentation, verbal reports of the site, type of IO device, any drugs given and date/time of insertion. IO devices are not considered definitive IV access; they should be frequently assessed for signs of extravasation and ideally removed within 48 hours(9,12).
Pain
Inserting an IO into the tibia is commonly reported to be more painful than the humerus(18). In conscious patients, visual analogue pain scores of 2.5-3.5 on a 10-point scale are commonly observed for insertion(17,18). Infusion through the device causes more pain than the insertion itself, as the insertion only involves a small cutaneous and bone site, but the infusion triggers multiple intraosseous pain receptors. The administration of 2% lidocaine prior to starting an infusion is known to considerably reduce pain scores(18).
Drugs
All resuscitation and anaesthetic drugs can be safely given via the IO route. Vasoactive drugs that are usually given through central access can also be safely administered. There are even case reports of CT contrast being given successfully via the tibial IO route. According to both ALS and APLS guidelines for cardiac arrest(1,2,11), IO access is the preferred route for administration of adrenaline when IV access cannot be obtained within 2 minutes.
Blood sampling
IO devices can be used to aspirate blood samples on initial placement, but only certain tests correlate reliably with IV samples. Of note, although blood gas analysis is possible, using an IO sample will damage the majority of blood gas analyser machines(9,10,20).
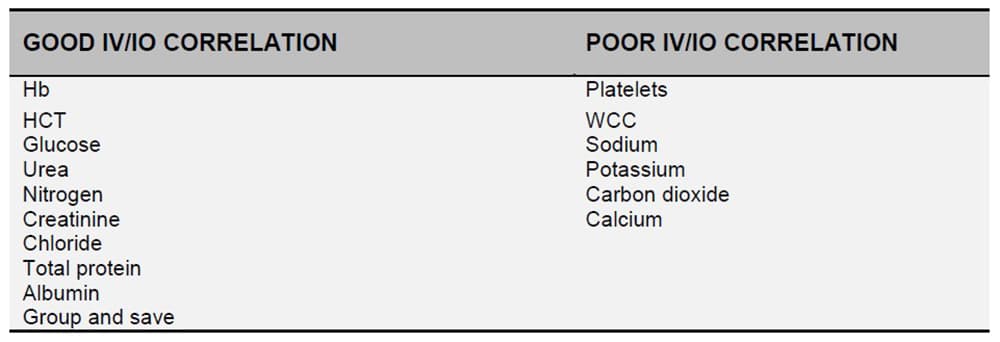
Table 2: Laboratory tests from intraosseous samples
COMPLICATIONS
Complications of IO insertion are often due to improper placement, leading to extravasation. Extensive extravasation could result in compartment syndrome.
There is a risk of osteomyelitis, which is particularly high when inserting through infected, damaged or burnt skin. It is also more common in devices that are left in for more than 24 hours(12,13). There is a risk of damage to underlying structures, with reports of tibial fractures in paediatric patients. When inserting a device into the sternum, there is a risk of pneumothorax, damage to the great vessels and mediastinitis.
In children, there is a risk of epiphyseal damage if the device is incorrectly placed close to a growth plate(11,12). Even with correct placement, there is a small risk of bone marrow emboli on insertion(19).
CONCLUSION
There is a range of intraosseous devices on the market. They provide a quick, easy to use, and dependable route for administration of all resuscitation and anaesthetic drugs. When combined with a pressurised system, IO access can also be used for rapid fluid resuscitation. IO access is a suitable short-term alternative for peripheral and central venous access, and some laboratory tests can be performed on an initial IO aspirate.
A comprehensive training and education programme, with regular refresher sessions, should enable quick and reliable placement of IO device with appropriate management and follow up.(12).
SUMMARY
- IO access provides rapid vascular access in a variety of emergency situations.
- There are several types of IO devices that can be used.
- The humeral site is generally the least painful and quickest to access
- All resuscitation and anaesthetic drugs can be given via the IO route.
- Fluids need to be administered under pressure.
- All devices need to be monitored and a clear handover given.
ANSWERS TO QUESTIONS
- ..
a. True: fluoroscopy has demonstrated infusion rates via IO access to be comparable to those achieved through subclavian central lines
b. True: all resuscitation drugs can be given via intraosseous route
c. False: the humeral site for insertion can be difficult to locate on obese patients
d. False: placement of an IO in the humerus is typically less painful than the tibial route - ..
a. True: the distal femur is a suitable site for IO in a child
b. False: the sternum is not a suitable site for IO in a child due to the risk of inserting the needle too far
c. True: the proximal tibia is a suitable site for IO in a child
d. False: the humerus is not recommended for IO insertion by many manufacturers in young children but has been described and clinical judgement should be used - ..
a. True: fractures proximal are an absolute contraindications to IO insertion as this will significantly affect intravenous uptake of medications and fluids
b. False: burns at any site are not a contraindication to IO insertion
c. True: local sepsis over the proposed insertion site is an absolute contraindications to IO insertion
d. False: systemic sepsis is not a contraindication to IO insertion - ..
a. True: leakage of drugs and fluids can occur at or near the IO insertion site
b. True: IO insertion can cause fractures of the bone
c. True: IO insertion can introduce infections and lead to osteomyelitis
d. False: osteoporosis is not a known complication of IO insertion
REFERENCES AND FURTHER READING
- Deakin CD, Nolan JP, Soar J, Sunde K, Koster RW, Smith GB, Perkins GD. 2010
European Resuscitation Council Guidelines for Resuscitation 2010 Section 4. Adult Advanced Life Support. Resuscitation. Oct;81(10):1305-52. - Resuscitation Council (UK) (2011) Provider Manual for use in the UK: European Paediatric Life Support Course (3rd Edition). London, BMJ
- Orlowski JP Emergency alternatives to intravenous access. Intraosseous, intratracheal, sublingual, and other-site drug administration. Pediatr Clin North Am. 1994 Dec;41(6):1183-99.
- Buck ML,Wiggins BS, Sesler JM. Intraosseous drug administration in children and adults during cardiopulmonary resuscitation. Ann Pharmcother. 2007;41(10):1679-1686.
- Kovar J, Gillum L. Alternate route: the humerus bone- a viable option for IO access. JEMS 2010;35(8):52-59
- Tocantins LM. Rapid absorption of substances injected into the bone marrow. Proc Soc Exp Biol Med 1940; 45: 292-6.
- Porth CM. Structure and function of the musculoskeletal system. In: Porth CM. Pathophysiology: Concepts of Altered Health States. 7th ed. Philadelphia, PA: Lippincott Williams &Wilkins; 2005:1357-1366.
- Dubick MA1, Holcomb JB. A review of intraosseous vascular access: current status and military application. Mil Med. 2000 Jul; 165 (7):552-9.
- Michael, W Day. Intraosseous devices for intravascular access in adult trauma patients. Critical care Nurse vol31 no 2 April 2011
- www.waismed.com/products.html Accessed Sept 2014
- www.arrowezio.com Accessed Sept 2014
- Phillips L, Brown L, Campbell T, Miller J, Proehl J, Youngberg B. The Consortium on Intraosseous Vascular Access in Healthcare Recommendations for the Use of Intraosseous Vascular Access for Emergent and Non-emergent Situations in Various Health Care Settings: Consensus Paper: Practice Crit Care Nurse 2010;30:e1-e7 doi: 10.4037/ccn2010632 2010
- Dogan A, Irmak H, Harman M, Ceylan A,Akpinar F, Tosun N. Tibial osteomyelitis following intraosseous infusion: a case report. Acta Orthop Traumatol Turc. 2004;38(5):357-60
- Frascone, R, et. Al. Obtaining Vascular Access: Is There a Place for the Sternal IO?, Air Medical Journal 2001, 20;6: 20-22.
- Wagner MB, McCabe JB. A comparison of four techniques to establish intraosseous infusion. Pediatr Emerg Care. 1988;4:87–91.
- McCarthy G, O’Donnell C, O’Brien M (2003) Successful intraosseous infusion in the critically ill patient does not require a medullary cavity. Resuscitation 56 (2): 183-6.
- Horton MA, Beamer C. Powered intraosseous insertion provides safe and effective vascular access for pediatric emergency patients. Pediatr Emerg Care. 2008;24(6):347-350.
- Philbeck TE, Miller LJ, Montez D. Pain management during intraosseous infusion through the proximal humerus. Ann Emerg Med. 2009;54(3):S128.
- Orlowski, James P.; Julius, Carmen J. Safety of Intraosseous Infusions: Risks of Fat and Bone Marrow Emboli to the Lungs. Critical Care Medicine: April 1988 – Volume 16 – Issue 4 – ppg 388
- Miller LJ, Philbeck TE, Montez DF, Spadaccini CJ A new study of intraosseous blood for laboratory analysis. Arch Pathol Lab Med 2010;134(9):1253-60.VS
This work by WFSA is licensed under a Creative Commons Attribution-NonCommercial-NoDerivitives 4.0 International License. To view this license, visit https://creativecommons.org/licenses/by-nc-nd/4.0/