Basic Sciences

Airway philosophy and anatomy of the nose and nasopharynx are covered in “airway Masterclasses” 1 and 2. This tutorial will cover the following topics:
- Anatomy of the larynx
- Laryngeal nerve injury (causes and consequences)
- Needle and surgical cricothryoidotomy
- Percutaneous tracheostomy
SELF ASSESSMENT
Before reading this tutorial, try and answer the following questions. Once you have been through the tutorial, look at them again to confirm your answers in light of what you have read.
- Q1. The recurrent laryngeal nerve:
- supplies some intrinsic muscles of the larynx
- supplies the cricothyroid muscle
- supplies the inferior constrictor muscle
- supplies sensation below the vocal cords
- supplies sensation to the posterior two-thirds of the tongue
- Q2. Regarding the innervation of the larynx:
- the recurrent laryngeal nerve supplies the only abductors of the cords
- the recurrent laryngeal nerve supplies sensory innervation to the whole larynx
- the lingual surface of the epiglottis is innervated by the glossopharyngeal nerve
- the internal laryngeal nerve is a branch of the vagus nerve
- damage to one recurrent laryngeal nerve leads to life-threatening stridor
- Q3. The following methods can block sensory input from the larynx:
- local anaesthetic spray to the cords
- local anaesthetic to the pyriform fossa
- retrograde local anaesthetic spray through cricothyroid membrane
- superior laryngeal nerve block in hypothyroid groove
- recurrent laryngeal nerve block
- Q4. Success of cricoid pressure in preventing aspiration depends on:
- absence of a nasogastric tube
- an intact cricoid cartilage
- the oesophagus being pressed onto the vertebral body
- extension of the neck
- preoxygenation for 5 minutes
What are the indications for performing a tracheostomy on the Intensive Care Unit?
What are the common complications of a percutaneous tracheostomy?
THE LARYNX
Functions
The larynx acts as a protective sphincter of the respiratory tract, separating the trachea from the upper gastrointestinal tract, preventing aspiration during swallowing. It contains the vocal apparatus, and so is important in communication, but it is also required for an effective cough and to perform a valsalva manoeuvre.
Anatomy of the larynx
The larynx is located in the anterior part of the neck, anterior to the bodies of the fourth to sixth cervical vertebrae and the laryngopharynx. On each side of the larynx is the carotid sheath and a lobe of the thyroid gland. The latter are joined anteriorly by the thyroid isthmus that overlies the second to fourth tracheal rings. Further anteriorly lies the superficial and deep fascia and platysma muscle.
The larynx is made up of 9 cartilages forming the laryngeal skeleton, these are joined by various ligaments and membranes (Figs 1,2). It has three unpaired cartilages (thyroid, cricoid, epiglottis) and three paired cartilages (arytenoid, corniculate, cuneiform).
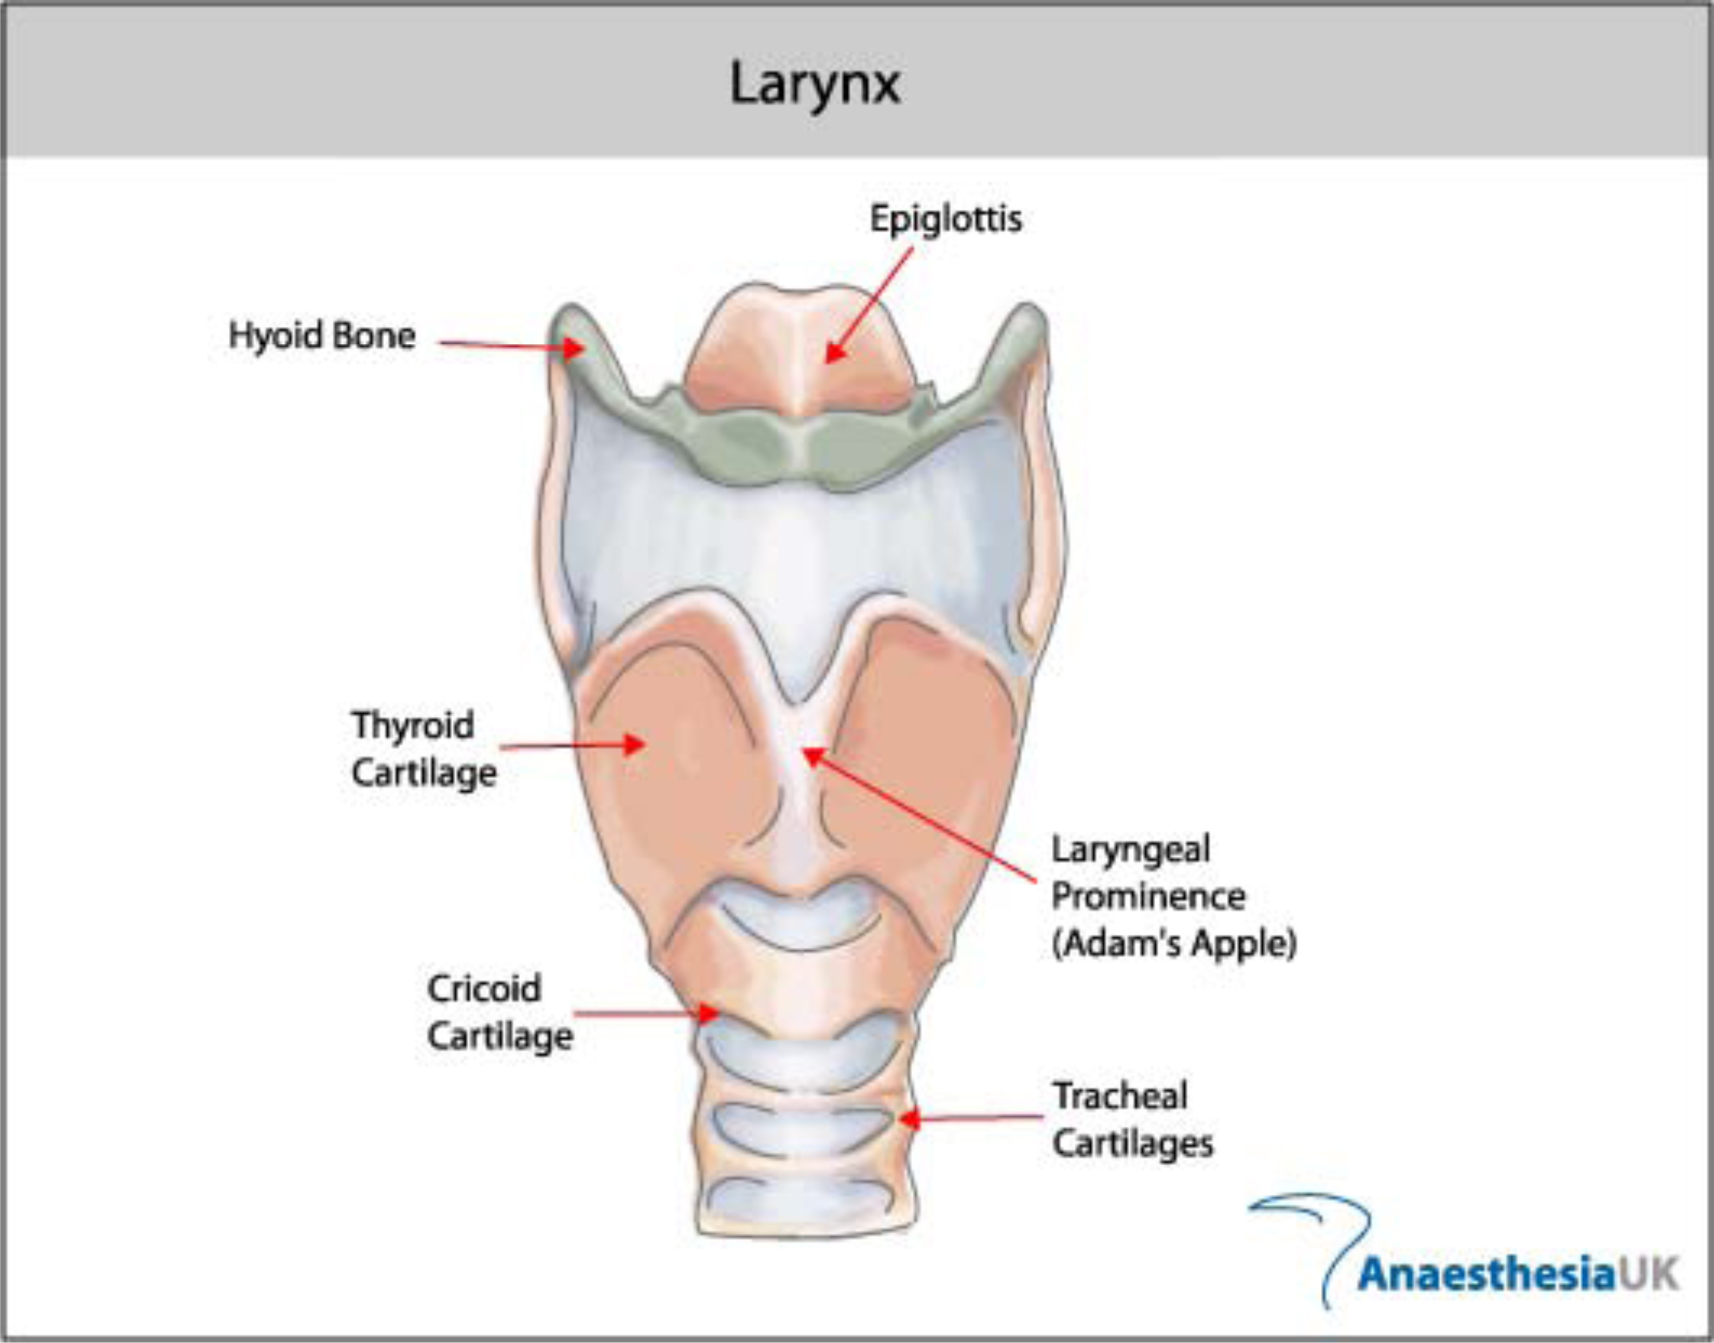
Figure 1. Anterior view of laryngeal cartilages
The hyoid bone (level with C3) is not strictly part of the larynx but is attached by the thyrohyoid membrane to the thyroid cartilage. Below this are the three unpaired midline cartilages:
- Thyroid cartilage. This is the largest of the laryngeal cartilages, shaped like a ‘shield’, with two laminae that are fused in the midline at an angle of 90°in men (120° in women) forming the subcutaneous laryngeal prominence (Adam’s apple). The upper (C4) and lower (C5) borders comprise superior and inferior cornua (horns). The superior border is attached to hyoid bone by the thyrohyoid membrane. The inferior cornu articulates with the cricoid cartilage.
- Cricoid cartilage. This is a complete ring of cartilage at level of C6, with a larger posterior lamina and narrower anterolateral arch. It articulates laterally with the inferior thyroid cornua, and posteriorly with the arytenoid cartilages. It is attached to the inferior border of the thyroid cartilage by the cricothyroid ligament and to the superior border of the first tracheal ring by the cricotracheal ligament. Because it is a complete ring, application of pressure anteriorly will compress the oesophagus that lies posteriorly – a technique used during rapid sequence induction of anaesthesia to help prevent aspiration of regurgitated gastric contents (cricoid pressure, Sellick’s manoeuvre).
- Epiglottis. This is a “leaf-shaped” elastic cartilage, the inferior narrower end is attached to the thyroid cartilage (to the back of the laryngeal prominence) by the thyroepiglottic ligament. It is attached anteriorly to the hyoid bone by the hyoepiglottic ligament. The upper broader end is free to project superiorly and the depression between the mucous membrane covering the posterior part of the tongue and the epiglottis is called the vallecula.
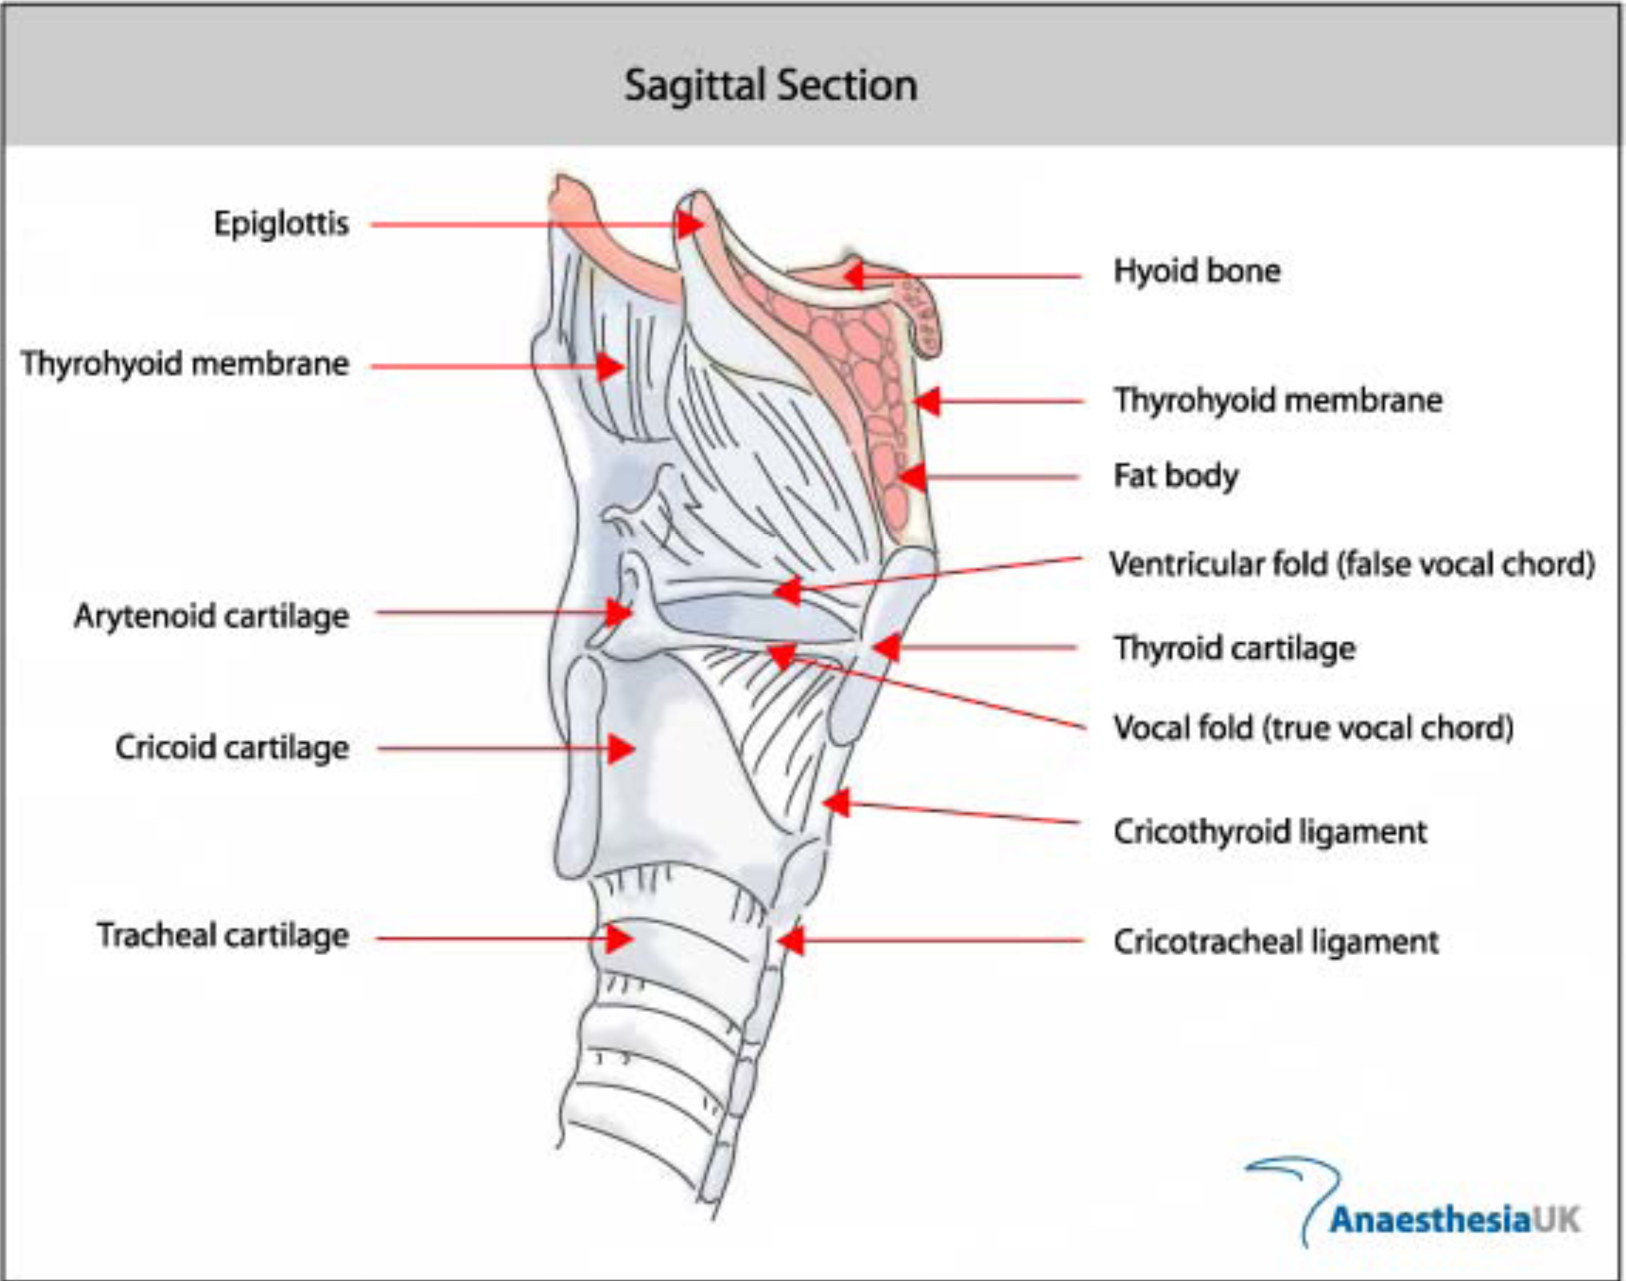
Figure 2. Lateral view of laryngeal cartilages
The paired cartilages
- Arytenoids. These are paired pyramidal shaped cartilages which articulate with the superior border of the lamina of the cricoid. Each has an apex to which the corniculate cartilages attach, an anterior vocal process (posterior attachment of vocal ligament) and a lateral muscular process which attaches to the cricoarytenoid muscles. The arytenoids may be the only visible structures in an “anterior” airway, as they are the posterior attachment of the vocal cords.
- Cuneiforms and corniculates. These are small cartilages found in the aryepiglottic folds (corniculate cartilages attach to apex of arytenoids).
Ligaments and membranes
There are a number of ligaments and membranes within the larynx. The ligaments link together the cartilages and the membranes contribute towards the vocal structures. Of particular note are the:
- Thyrohyoid membrane – connects the thyroid cartilage and the hyoid bone.
- Hypo-epiglottic ligament – connects the hyoid bone to the lower part of the epiglottis
- Cricothyroid membrane – connects the thyroid and the cricoid, this is the site chosen for cricothyroidotomy (see below).
- Cricotracheal ligament – connects the cricoid to the first ring of the trachea.
- Cricovocal membrane – connects from the upper border of the cricoid cartilage to the laryngeal prominence of the thyroid cartilage and vocal process of the arytenoid. The upper border forms the vocal ligament, that provides the structure for the true vocal cord.
Blood supply of the larynx.
The superior laryngeal artery is a branch of the superior thyroid artery, and the inferior laryngeal artery a branch from the inferior thyroid artery.
The innervation of the larynx
The larynx is supplied by branches of the vagus (X) cranial nerve:
Superior laryngeal nerve (SLN). This leaves the vagus high in the neck. It divides into the:
- Internal branch: Sensory supply to the glottis and supraglottis, and inferior epiglottis.
- External branch: Motor supply to the cricothyroid muscle, which tenses the vocal folds.
Recurrent laryngeal nerve (RLN). On the right, leaves the vagus as it crosses the subclavian artery, passes under the artery and ascends to reach the larynx, lying between the oesophagus and trachea. On the left, leaves the vagus as it crosses the arch of the aorta, passes under the aorta and ascends as on the right. Sensory supply to the subglottis and motor supply to all intrinsic muscles of the larynx (except cricothyroid).
Glossopharyngeal (IX) cranial nerve. Sensory supply to the tongue base and vallecula (superior border of epiglottis).
THE APPLIED ANATOMY OF THE LARYNX
Local anaesthesia of the airway is essential for awake fibreoptic intubation as described in Airway Masterclass 2, the simplest and commonest method to use is topical lignocaine (nebulised, gargled or most commonly a ‘spray as you go’ technique). This method can be supplemented with a SLN block and a transtracheal block (see below). The external branch of the SLN can be blocked below the greater horn of the hyoid, through the thyrohyoid membrane. The internal branch of SLN can be blocked by placing pledgets soaked in lignocaine in the pyriform fossa.
Transtracheal block.
This provides rapid anesthesia of the entire trachea between the carina and the vocal cords. Prepare 3mls of 2% lignocaine in a 10ml syringe with a 23G needle attached. Identify the cricothyroid membrane and insert the needle, directed posteriorly. Confirm that the tip of the needle is within the trachea by aspirating air. The lignocaine is then injected rapidly, and the needle withdrawn. The patient will cough, drawing the local anesthetic down to the carina, and then spraying it over the entire trachea, up to the vocal cords.
Complications of the transtracheal block include bleeding, tracheal injury, and subcutaneous emphysema.
The laryngeal nerves can be injured in a number of ways:
- Surgery (thyroid, carotid artery, lung and cardiac)
- Cancer – lung, oesphageal or enlarged lymph nodes
- Enlarged right atrium
- Thyroid gland
- Cervical trauma
- Insertion of a Laryngeal Mask Airway, endotracheal intubation
SLN – external branch – may be damaged during thyroid surgery, as it lies with the superior thyroid vessels. Loss of cricothryoid causes loss of vocal cord tension and hoarseness following unilateral damage. This may be temporary as the opposite cricothyroid often compensates.
RLN – may be damaged during thyroid surgery, as it lies close to the inferior thyroid vessels. Due to the long thoracic course of the nerve, it can be damaged by aortic aneurysms, enlarged right atrium, lung and oesphageal cancer and enlarged lymph nodes.
If unilateral RLN injury occurs, the vocal cord adopts a midline position, resulting in voice hoarseness (this may be the presenting complaint of serious underlying pathology), ineffective cough and recurrent aspiration. In the case of bilateral RLN injury, vocal cord function is lost, resulting in life threatening airway obstruction.
Emergency Airways
Can’t intubate, can’t ventilate (CICV)
This is a life threatening emergency which, if managed badly, will lead to morbidity and death. Knowledge of the anatomy of the larynx will aid in the safe and effective management of this situation. This tutorial will cover the procedures of emergency needle and surgical cricothryoidotomy, but both skills should be practiced where ever possible on a manikin. The advice given below is based on the use of what is felt to be the most widely available equipment in hospitals, accepting that there are a variety of commercial pieces of apparatus now available. It is essential that everyone should know the location of such equipment and be familiar with how to use it in an emergency situation. For further guidance of CICV see Plan D of the Difficult Airway Society guidelines (http://www.das.uk.com/guidelines/cvci.html).
In the situation of CICV with increasing hypoxaemia, the decision to attempt transtracheal oxygenation must be made early as it takes time to gather equipment and achieve success. Even then, ability to oxygenate may be limited. Having a plan of what to do in this situation is essential in order to prevent hypoxic cardiac arrest or hypoxic brain damage.
Needle cricothyroidotomy
This is quicker and easier than a surgical cricothyroidotomy. It is performed via the cricothryoid membrane that is relatively easily palpable, avascular and superficial.
- Prepare a 10ml syringe containing 5ml saline and attach to a large bore IV cannula (14-16G) .
- Extend the neck and identify the cricothyroid membrane. This is usually felt as the depression between the thyroid cartilage and cricoid ring.
- Stabilise the trachea with the thumb and forefinger of one hand to prevent lateral movement of the trachea.
- Puncture the skin vertically in the midline, directly over the cricothryoid membrane.
- Advance through the cricothyroid membrane in a slightly caudal direction. Withdraw the syringe plunger gently, aspiration of air bubbles freely into the syringe comfirms tracheal placement of the tip of the cannula.
- Angle the cannula at approximately 45 degrees and advance the cannula over the needle, taking care not to advance the needle too far and risk perforating the posterior wall of the trachea (Fig 3a).
- Remove the needle and try to prevent the cannula from kinking (ask an assistant to hold it in place) and being displaced as oxygen is delivered.
- Attach the cannula to high flow oxygen supply via oxygen tubing with a hole cut into the side of the tubing or via a 3-way tap (Fig 3b) or “Y” connector. Intermittent ventilation can be achieved by occluding the open hole cut into the oxygen tubing (or occlusion of one limb of the connector) with your thumb. The usual recommendation is to insufflate oxygen by occlusion for one second and releasing it for four seconds. The latter allows expiration to occur (and excess gas to be vented) via the patient’s own airway, NOT the cannula. This is usually heard as vigorous bubbling sound as gas escapes via this route during insufflation.
- An alternative is to use a device that delivers high flow oxygen, e.g. a Sander’s injector or Manujet device. There is a high risk of barotrauma with these devices due to the high pressures which can rapidly develop.
- Check for rise and fall of the chest.
- Plan for an emergency tracheostomy.
Transtracheal oxygenation is a temporary measure (30-40min), ultimately limited by inadequate elimination of carbon dioxide as effective ventilation is not possible. If surgical emphysema develops – stop ventilating immediately as this signifies a misplaced cannula, and if using a Sander’s injector can result in catastrophic surgical emphysema.
The technique described above is very useful if there is no commercial kit available to carry out a cricothyroidotomy (e.g. Patil cricothyroidotomy kit, Cooke Medical, Fig 3c). However, when using a small diameter device, there is a high risk of it becoming blocked or displaced.
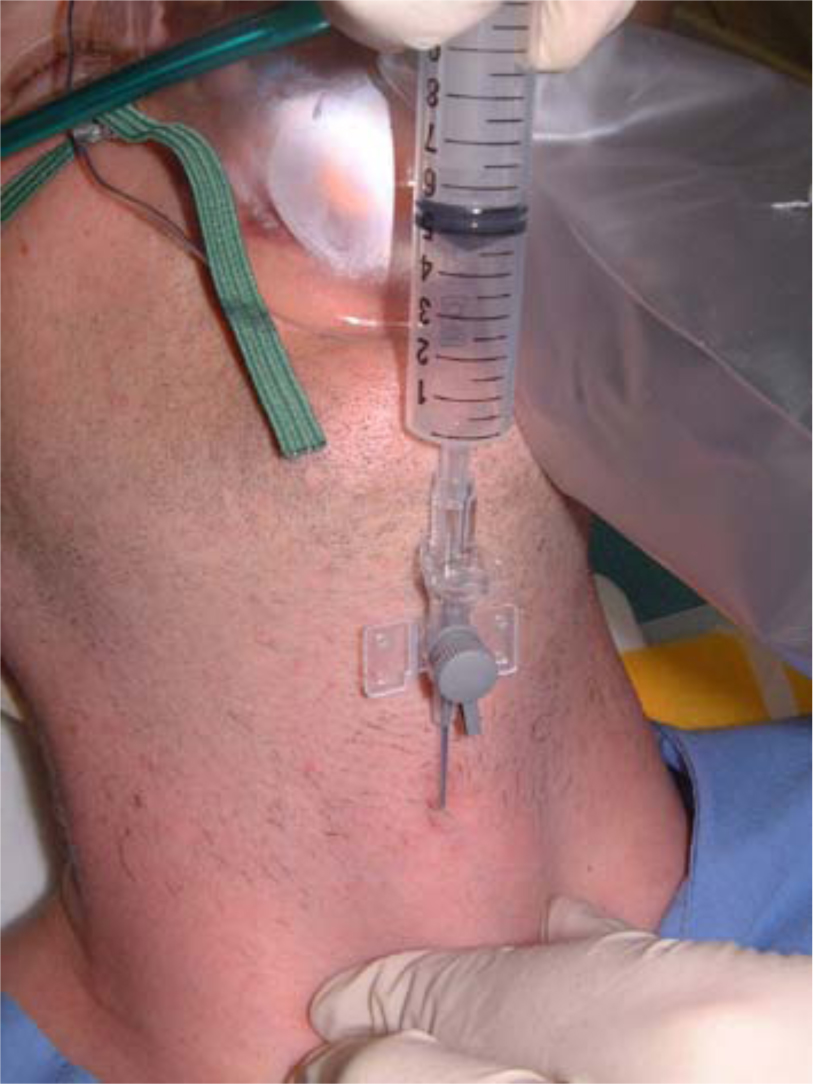
Figure 3a. Needle cricothyroidotomy
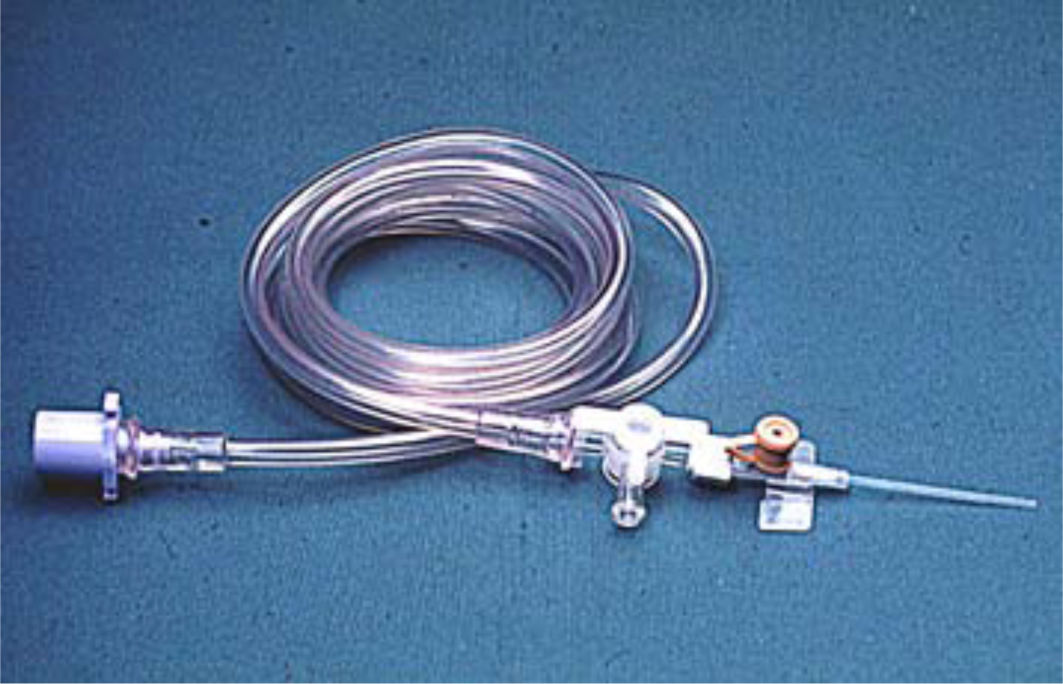
Figure 3b. Oxygen tubing attached to cannula via 3-way tap
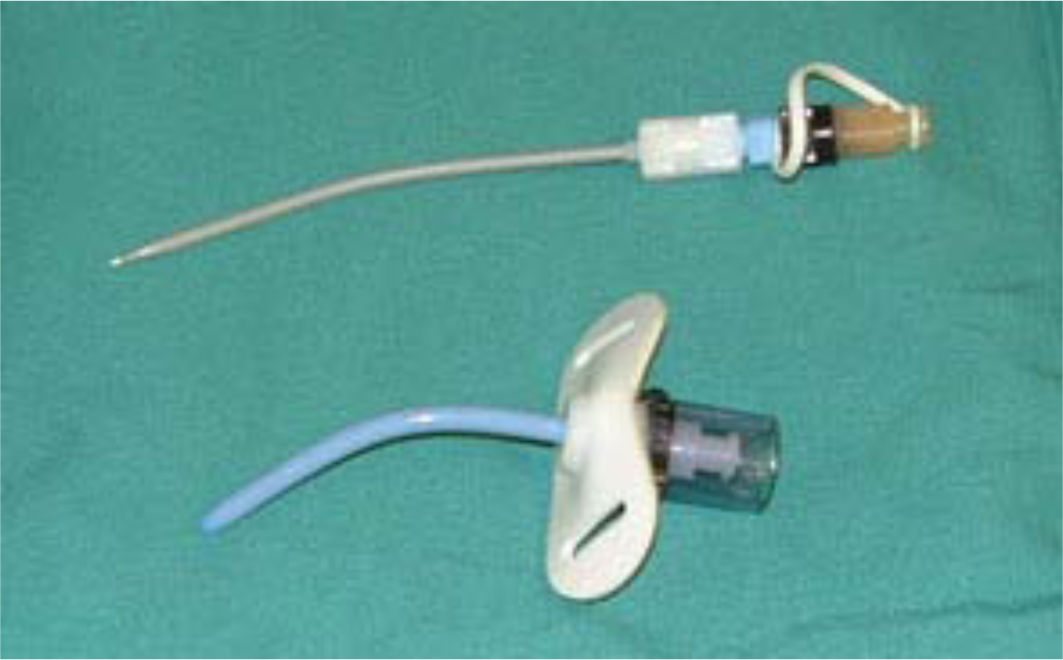
Figure 3c. Patil cricothyroidotomy kit.
A major disadvantage of this technique is when the upper airway is completely occluded and expiration and escape of excessive gas volumes cannot occur via the patient’s normal airway. In these circumstances, only small volumes of oxygen should be insufflated and arrangements made for an urgent surgical airway to allow ventilation (see below). Simply inserting additional cannulas does not allow expiration to occur. (To test this, take a clean 16G cannula and try to exhale through it!).
A number of other techniques of delivering oxygen via a transtracheal cannula have been described, (e.g. 16G cannula connected to ETT connector from 3.5 neonatal tracheal tube, 16G cannula connected to 10ml syringe with plunger removed, size 7.0 ETT inserted into barrel and cuff inflated), these only allow connection to a self-inflating bag-valve device or anaesthetic breathing system and sufficient pressure to overcome the resistance of the cannula cannot be generated. They therefore cannot be recommended.
Surgical cricothyroidotomy
This technique allows insertion of a relatively small diameter cuffed tracheostomy tube via the cricothyroid membrane. Purpose-made devices are available and usually rely on the Seldinger method for introduction (Melker® emergency cricothyrotomy). However, a small diameter (6.0mm) tracheostomy tube can be inserted as described below. Having inserted a relatively larger diameter cuffed tube, a normal breathing system can be used to ventilate the patient, attachment of capnography and avoidance of barotrauma. An alternative cuffless device is the Portex Mini-trach kit (4.0mm tube), but ventilation is less effective.
Briefly, the technique consists of:
- Identify the landmarks as described earlier.
- If time permits, infiltrate the skin over the membrane with 2ml of lidocaine containing adrenaline (epinephrine) 1:200,000 to reduce bleeding.
- Stabilize the larynx with one hand, make a transverse incision 2-3cm long through the skin.
- Insert a finger to confirm the position of the cricothyroid membrane.
- Incise the membrane transversely.
- Dilate the opening using the scalpel handle or artery forceps.
- Insert a lubricated tracheostomy tube (6 mm), directed caudally.
- Inflate cuff and check ventilation, chest rising and auscultate.
- Secure tube, attach capnograph if possible.
This technique is usually associated with significant bleeding from blood vessels dilated as a result of hypoxia and hypercapnia. Do not stop to try and secure haemostasis, most of the bleeding will abate once the hypoxia has been corrected. In the presence of laryngeal trauma or swelling over the larynx, an emergency tracheostomy is the technique of choice.
Complications of emergency airways
The immediate complications of emergency cricothyroidotomy are:
- Incorrect placement and creation of a false passage
- Perforation of posterior wall of trachea, oesophagus and other surrounding structures
- Pneumothorax, surgical and mediastinal emphysema,
- Haemorrhage
- Inadequate oxygenation leading to hypoxia and death.
Percutaneous tracheostomy
This is a common procedure performed on patients within the intensive care unit (ICU) without the need to transfer the critically ill patient to the operating theatre.
Indications:
- Facilitate weaning from positive pressure ventilation and sedation
- Bypass an obstruction of the upper respiratory tract.
- Prevent aspiration from the pharynx or gastrointestinal tract.
- Facilitate removal of secretions by aspiration.
- Facilitate long-term airway management
Conditions in which surgical tracheostomy may be safer than percutaneous tracheostomy:
- Emergency tracheostomy
- Unable to palpate anatomical landmarks, or abnormal anatomy
- Previous neck surgery may distort the anatomy
- Unstable cervical spine fracture
- Malignancy at the site of tracheostomy
Contraindications to percutaneous tracheostomy:
- Localised infection
- Coagulopathy
- PEEP > 15cmH20 and/or high FiO2 requirements
- Factors suggesting surgical tracheostomy safer (see above)
- Raised intracranial pressure
PREPARATION
This is paramount, ensure decision to perform tracheostomy is appropriate and safe. Preparation of equipment and patient takes time (Fig 4). A separate trained anaesthetist for managing both the airway and anaesthesia of the patient is essential. They should be equipped with drugs and instruments for a potentially difficult re-intubation. A total intravenous technique provides smooth anaesthesia for performing the bronchoscopy and tracheostomy, though an inhalation technique is possible.
Ideally, ensure that the patient is fully monitored including end-tidal CO2. The patient should be preoxygenated with 100% oxygen for at least 5 minutes before starting the procedure. The neck is extended by placing a sandbag or similar under the patient’s shoulders and the head in a head ring. This brings as much of the trachea as possible into the neck. The thyroid cartilage, cricoid cartilage and first three tracheal rings are identified by palpation. The tracheostomy should ideally pass between the second and third tracheal rings, although a space one higher or lower may be employed. Placing the tracheostomy next to the cricoid, can cause tracheal erosion and long-term problems. Infiltrate the soft tissues of the chosen site for tracheostomy with lidocaine 1% with 1:200,000 adrenaline to reduce bleeding.
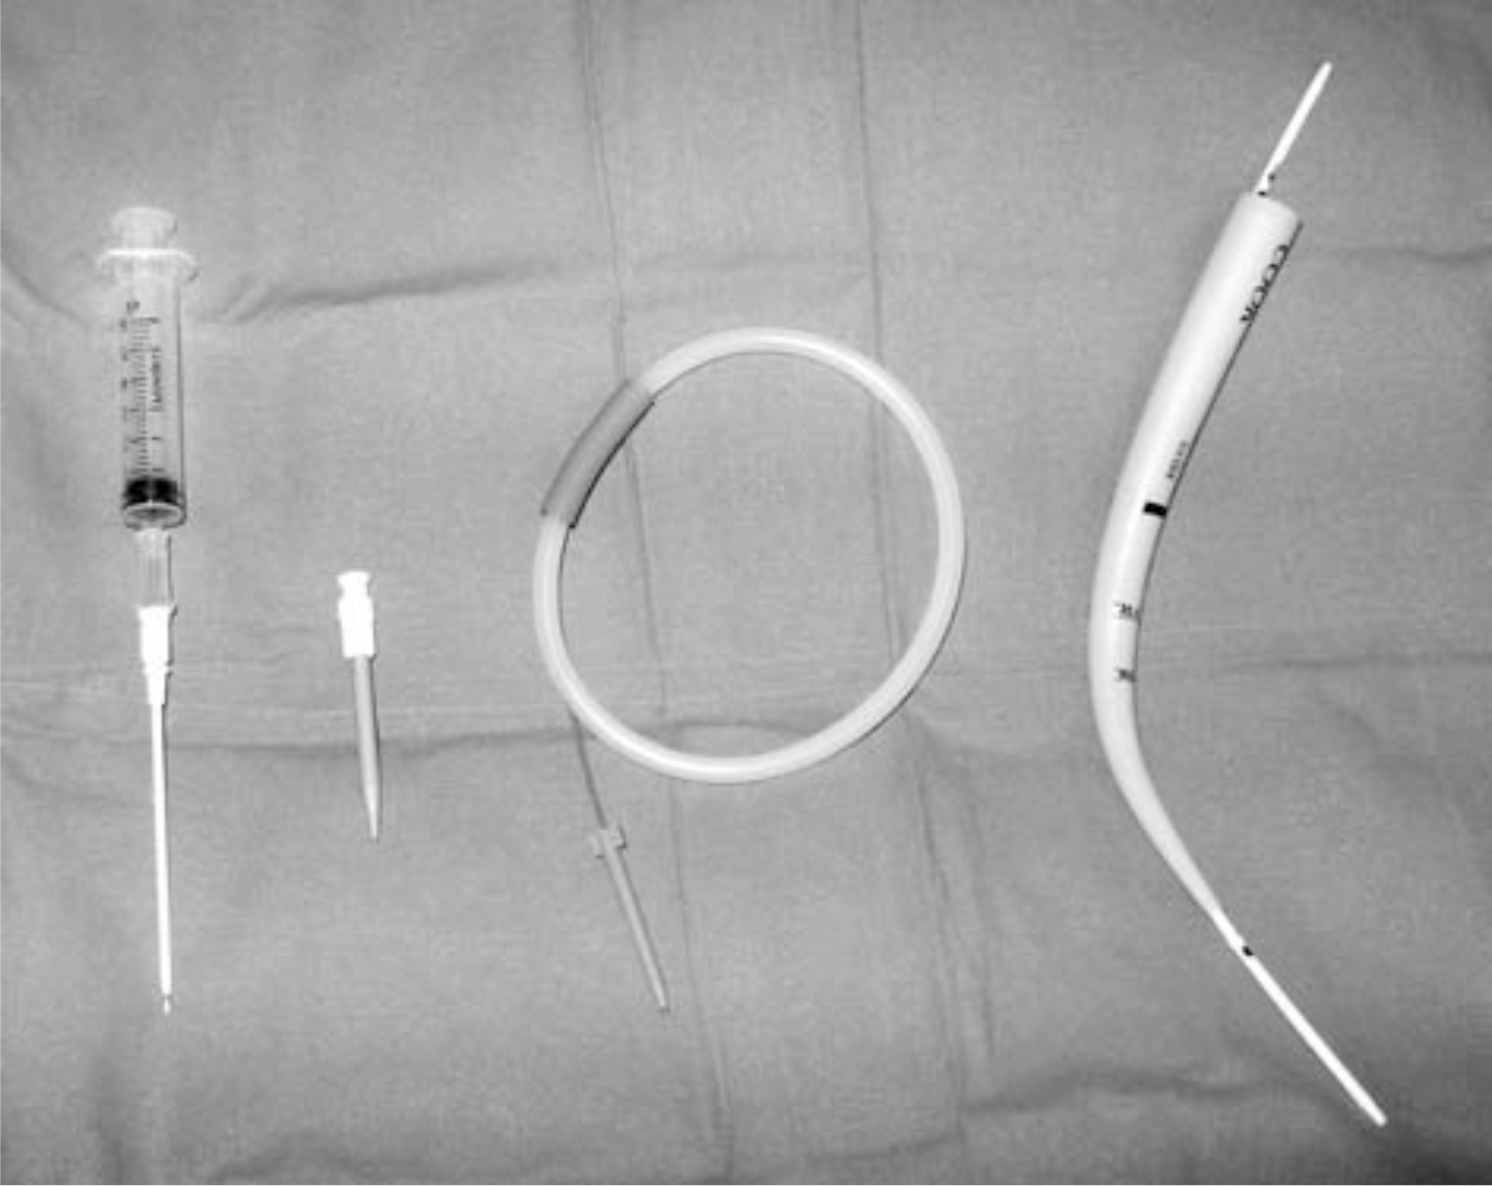
Figure 4. A percutaneous tracheostomy set. Insertion of the tube is based on the Seldinger technique followed by dilatation of the track with the single dilator.
PROCEDURE
Ideally, this procedure should be conducted with bronchoscopy as described below to increase the success and reduce complications. If a bronchoscope is not available, great care must be taken to ensure that the track created is into the trachea. The risk of misplacement is high, and if there is any doubt, a surgical tracheostomy is a safer option.
Following induction of anaesthesia, the patient is prepped and draped. The bronchoscope is passed through the tracheal tube and the anatomy of the airway visualised. The cuff of the existing tracheal tube is deflated and the tube is withdrawn under direct laryngoscopy until the cuff is seen (necessary to allow unimpeded passage of guide wire and dilator(s) into the trachea). The tracheal tube must then be secured to prevent dislodgement and the cuff reinflated. The bronchoscope is then positioned in the tracheal tube to observe or check that the point of entry of the needle is through the centre of the anterior tracheal wall. Care must be taken not to damage the bronchoscope with the needle. A 2 cm horizontal incision is made with a scalpel blade through the skin. The introducer needle and cannula is then slowly advanced in the midline, through the incision, at 45 degrees to the skin, until air is aspirated from the trachea. The needle is removed, leaving the cannula in the trachea and a J-tipped flexible guidewire is threaded through the cannula into the trachea and the position checked using the bronchscope. Next, a small, firm introducing dilator is slid over the wire, through the soft tissues into the trachea. The dilator is then removed, ensuring that the wire stays in place.
The track is now gradually dilated, using either a single tapered dilator or a series of gradually increasing diameter dilators. If a dilator does not pass easily, often it is the skin that impedes progress, and the incision has to be widened slightly with the scalpel. Once the track is maximally dilated, the tracheostomy tube is inserted over the wire and the wire removed. With the tracheostomy tube in place, the tracheal tube is removed and the ventilator is connected to the tracheostomy. The chest is auscultated for adequate ventilation and the ventilator checked for appropriate tidal volumes and airway pressures. The tracheostomy is then secured with a tie, and the lumen aspirated to remove blood and secretions. Presence of surgical emphysema at the site is also watched for, and chest X-ray is performed to check for tube position and pneumothorax. Alternatively, a bronchoscope can be inserted via the tracheostomy tube into the trachea, and satisfactory position can be confirmed without the need for CXR.
Complications
Early
- Hypoxia during insertion due to failure of ventilation.
- Pneumothorax, pneumomediastinum or creation of a false passage and subcutaneous emphysema due to the placement of the tracheostomy tube in the paratracheal space.
- Damage or injury to the posterior tracheal wall may lead to tracheo-oesophageal fistula.
- Haemorrhage. Major bleeding is unusual. Minor bleeding can usually be controlled by pressure or occasionally a suture. Haemorrhage into the airway is potentially dangerous as it may result in a blood clot obstructing the airway.
- Dislodgement / Accidental decannulation.
- Secondary haemorrhage (infection or erosion of vessels)
Late
- Subglottic stenosis (lower than surgical tracheostomy).
Answers to MCQs
- TFFTF
- TFTTF
- TTTTT
- TTTTF
References and Further Reading:
- Oxford Handbook of Anaesthesia 2nd Allman KG, Wilson IH Oxford University Press 2006.
- Concise anatomy for Anaesthesia. Andreas Erdmann.
- Update in Anaesthesia: Percutaneous tracheostomy. Professor A Rudra. Issue 15 (2002) Article 16
- www.frca.co.uk
- das.uk.com Difficult Airway Society homepage, access to their guidelines.
- cookmedical.com (shows examples of commercially available emergency cricothyroidotomy kits)
The authors would like to thank Anaesthesia UK for permission to reproduce figures 1 and 2.
This work by WFSA is licensed under a Creative Commons Attribution-NonCommercial-NoDerivitives 4.0 International License. To view this license, visit https://creativecommons.org/licenses/by-nc-nd/4.0/